
// docs / user-manual
// user manual
PDFized User Manual
How the AI redaction workspace works, screen by screen: the Surface, the Dossier, and the five steps from upload to a permanently redacted PDF.
Version 0.71Updated October 20268 min read
- 1Uploaddrop a PDF
- 2Reviewsee highlights
- 3Adjustremove / add
- 4Previewblack boxes
- 5DownloadREDACTED
Every document follows these five steps → section 3
1.Toolbar
The toolbar in the top-right corner controls navigation, tools and zoom. Think of the Surface as a digital desk: spread documents out and move around freely.
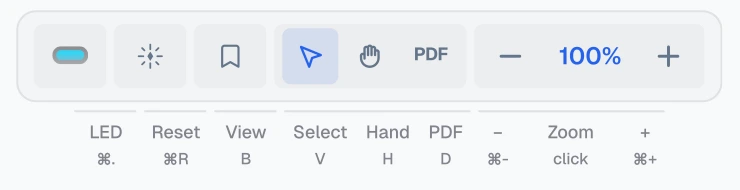
Surface LED indicator ⌘.
The glowing LED shows whether the Surface reacts to your actions. Click it or press ⌘. (Command + period) to switch states.
Active
Full interactivity: pan, zoom, select and move dossiers, drag to create selections.Paused
Surface frozen. Dossiers stay in place but remain fully interactive inside: scroll pages, click links, select text without moving the panel.Tools
| Reset ⌘R | Return to the start position | Hand H | Pan the Surface (or hold Space) |
| Select V | Click or lasso-select dossiers | Zoom ⌘− ⌘+ | Reduce or increase magnification |
| PDF D | Draw a dropzone | Zoom % click | Toggle 100% / fit |
| Viewpoint B | Save the current view location |
2.Drag & Drop
Two ways to bring PDFs onto the Surface.
Method 1 · Direct drop
Drag a PDF from your computer and drop it anywhere on the Surface. A dossier is created at the drop point and AI analysis starts automatically.Method 2 · Dropzone tool
For precise placement and size: select the PDF tool (D), draw a rectangle to define the viewing area, drag the PDF into the zone, and the document loads into that area.After upload
3.Redaction Workflow
From upload to the final redacted PDF in five steps.
| 1 · Upload | Drag the PDF onto the Surface. AI analysis starts automatically. |
| 2 · Review | See highlights on the pages. Open the right-hand Explorer (→) for the full list of findings. |
| 3 · Adjust | Remove items that should stay visible; add manual redaction regions for anything the AI missed. |
| 4 · Preview | Toggle PREVIEW to see black boxes over the selections. |
| 5 · Download | Click ⬇ REDACTED for the final PDF with permanent redactions. DOWNLOAD ORIG keeps the untouched original available. |
4.Document Explorer
The left-hand panel is your document library: status indicators plus open, close and remove.
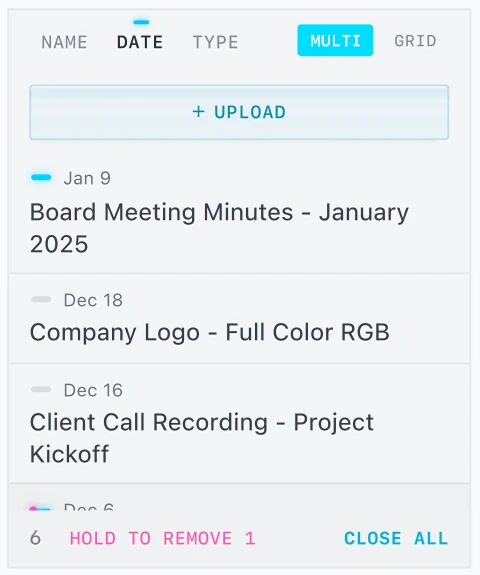
| Status | Meaning |
|---|---|
| Open | Displayed on the Surface. Click to focus. |
| Opening | Loading. The LED blinks while the dossier is created. |
| In library | Stored but not displayed. |
| Selected | Pink dot when selected. |
| Remove | Hold to delete from the library. |
| Close all | Closes every dossier on the Surface. |
Viewing modes
| Mode | Behaviour | Single-click | Double-click |
|---|---|---|---|
| Single | One document at a time. | Opens (closes others) | Closes if open |
| Multi | Several documents open. | Select only | Opens or closes |
| Auto | Follows the Surface state: Single / Multi | As the active mode | As the active mode |
5.PDF Dossier
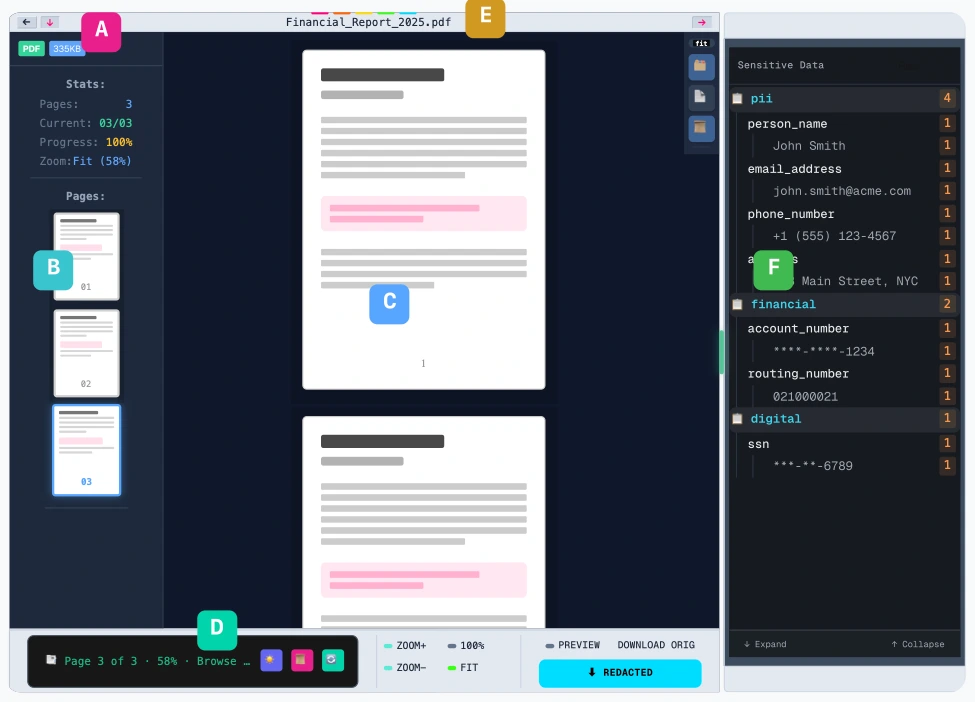
The Dossier is the main viewing component. Each open document appears as a window on the Surface with modular, interchangeable panels.
5.1 Anatomy
5.2 Central Window
The central window holds the document chrome, the LED controls and header toolbar, plus the sidebar for navigation and settings.
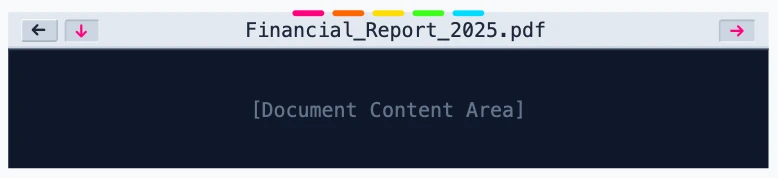
| LED | Action |
|---|---|
| Pink | Close · remove the dossier from the Surface |
| Orange | Unload · close the document, keep the frame |
| Yellow | Minimize · collapse the window |
| Green | Fullscreen · expand to the viewport (⇧⌘F) |
| Cyan | Panels · toggle both ear panels |
| Sidebar tool | Does |
|---|---|
| Select V | Click annotations |
| Highlight H | Text highlight |
| Eraser E | Remove an annotation |
| Rectangle ▢ | Draw regions |
| Freehand ✏ | Freeform mark |
| View ━ 🗂 📄 📜 | Zoom presets · thumbnails · single page · browse |
5.3 Control Tray
The tray at the bottom adapts to the workflow state: progress and analysis controls while uploading, redaction controls once analysis is complete.

Analyzing Hashing → Checking → Uploading → Confirming → Processing (AI extraction and annotation).

Ready Preview toggles black boxes over the selections. Download the original unmodified, or the PDF with permanent redactions applied.

Stale Annotations changed after the last render. Click Apply to regenerate the redacted file.

Generating The redacted PDF is being created; progress is shown in the tray.

MANUAL / AUTO switches which annotation source the tray acts on: your own marks or the AI findings.
5.4 Annotation Explorers
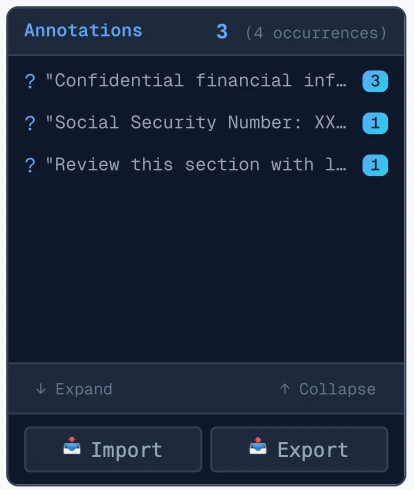
Two collapsible side panels, the “ears”, manage annotations: the left for manual marks, the right for AI-detected data.
← Left ear · Manual user-created annotations with import/export
Right ear · Auto → AI-detected sensitive data by taxonomy
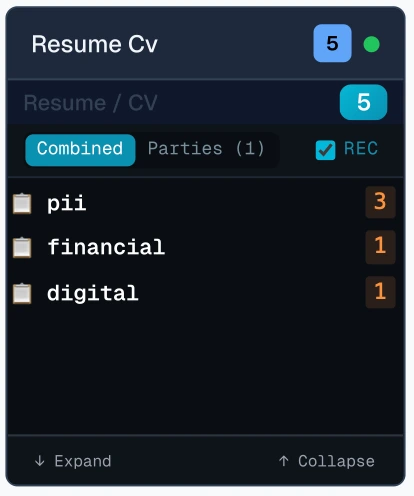
| Feature | ← Left ear · Manual | Right ear · Auto → |
|---|---|---|
| Source | Your drawings and highlights | AI extraction |
| Organization | Flat list by page | Taxonomy tree (group → kind), e.g. pii · financial · digital |
| Filtering | — | All / Rec toggle, Party filter (combined parties) |
| Import / Export | JSON file | — |
6.Keyboard Shortcuts
| Navigation & viewing | |
|---|---|
| ⌘ + Scroll | Zoom at cursor |
| Scroll | Pan vertically |
| ⇧ + Scroll | Pan horizontally |
| Space (hold) | Temporary hand tool |
| ⌘1 | Fit all content |
| ⌘R | Reset view |
| Selection & editing | |
|---|---|
| Click | Select one dossier |
| Drag on Surface | Lasso-select several |
| ⇧ + Drag | Add to selection |
| ⌘A | Select all |
| Esc | Deselect / exit fullscreen |
| Delete | Remove selected |
| Viewpoints & modes | |
|---|---|
| ⌘1–9 | Jump to viewpoint |
| ⌘⇧1–9 | Save viewpoint |
| ⇧⌘F | Fullscreen |
| ⌘. | Toggle pause |
| V H D B | Select · Hand · PDF · Viewpoint |
7.Quick Reference
Surface controls
| Pan | Scroll · Space+Drag |
| Zoom | ⌘ + Scroll |
| Reset view | ⌘R |
| Fit content | ⌘1 |
| Tools | V Select · H Hand · D PDF · B Viewpoint |
Document controls
| Select all | ⌘A |
| Delete selected | Delete |
| Fullscreen / exit | ⇧⌘F · Esc |
| Toggle pause | ⌘. |
| Viewpoints | ⌘1–9 jump · ⌘⇧1–9 save |
Questions about the manual? Something unclear, missing or out of date – write to us, we answer every message.
Write to us →PDFized AI Redaction Manual · v0.71© 2026 PDFized · Last updated October 2026