When it comes to redacting, you may probably think the process is all about drawing black boxes. Wrong! The process is about making sure that all the data underneath those boxes is gone. Like, really gone. If you’ve got a scanned PDF doc in your hands, we must admit that the process gets a bit more “cloak and dagger.” But worry not! We are here to provide you with a quick yet comprehensive guide helping our users navigate the tricky waters of scanned document security and, what is more important, stay sane along the way.
To redact a scanned PDF, you must run OCR first to convert the image into searchable text, then apply permanent redaction to the text layer, and verify the sensitive data is fully removed - not just hidden.
What Is a Scanned PDF, Exactly?
To make things clear, we recommend thinking of a standard PDF (like one exported from Word) as a collection of digital characters and fonts. A scanned PDF, however, is basically just a pic of a piece of paper wrapped in a PDF container. Simple as that. When you scan such a doc, the gadget doesn't see “letters.” What it sees is a grid of colored pixels. To the software, your signature and a Starbucks coffee stain on the page are technically the same thing. What exactly? Well, just dots on a page. This kind of “flat” nature is what makes them so difficult to edit or search without the right instruments in your arsenal.
The problem is that if there is no text layer, a redaction instrument that you use does not know where, for example, a “Social Security Number” ends and a “Logo” begins. You are essentially doing your best in order to edit a photo, which requires a specialized approach to make sure the data is truly destroyed.
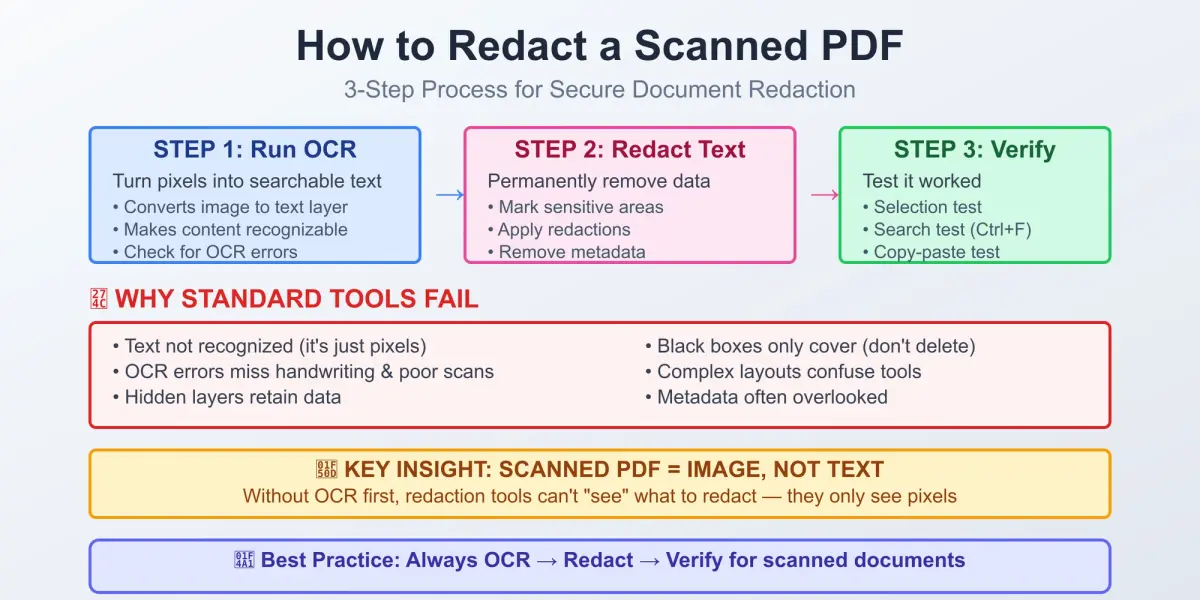
Why Standard Redaction Fails on Scanned PDFs
Most people make the mistake of using standard redaction instruments that are often designed to work on digital text, assuming the content is selectable and searchable. But when it comes to scanned PDFs (the images of documents, as we’ve mentioned above), these conventional methods tend to fail in most cases. Here are the most common ‘whys’ behind those cases:
- Text is not recognized as text. Since in scanned PDFs, the content is an image rather than actual text, standard redaction tools cannot detect or manipulate text that hasn’t been converted into a searchable format. As a result, you see how sensitive information is visible in the image layer.
- Hidden metadata and OCR limitations. Even if optical character recognition (OCR) is applied, errors are common, especially when you have to deal with handwritten notes, unusual fonts, or scans of a horrible quality. This means redaction may miss certain words or characters entirely, exposing confidential details you’d prefer to keep from others’ eyes.
- Layered content can retain data. Some scanned PDFs include multiple layers. The latter includes things like annotations or comments that standard redaction tools often ignore. Sensitive data can persist in these hidden layers, even after the main content appears to be redacted. The result? Opps!
- Appearance-based redaction is misleading. Loads of basic redaction methods simply overlay a black box over the visible text. Yes, it kind of seems secure visually. However, the underlying image or text can still be copied, extracted, or recovered using simple techniques. This makes the redaction totally ineffective.
- Complex layouts confuse redaction tools. Docs with tables, multi-column layouts, or mixed content (images + pics) can cause standard redaction tools to misalign or skip certain areas. This inconsistency increases the risk of accidentally leaving sensitive information available to literally everyone out there.
Ready to redact like a pro? In a couple of simple steps, you’ll get the job done while preserving the most precious details.
This is exactly why simply white-out on a PDF is not secure, as it only hides the content visually while leaving the underlying data fully accessible.
| Feature | Standard PDF | Scanned PDF |
|---|---|---|
| Text is selectable | ✅ | ❌ |
| OCR required | ❌ | ✅ |
| Standard redaction works | ✅ | ❌ |
| Metadata removal needed | ✅ | ✅ |
| Verification required | ✅ | ✅ |
| Risk of failed redaction | Low | High |
Step 1 – Run OCR First
Before the effective redaction kicks in, you need to turn those “pixels” back into “data.” You do this through Optical Character Recognition (OCR). Simply put, the latter “reads” the pic and creates an invisible layer of digital text. It sits perfectly on top of the scanned letters. When making OCR part of the process, you ensure that your redaction tool can recognize exactly where specific words (like names or account numbers) are placed. As a result, no secret detail becomes known unless you want it.
- Pro recommendation: It is also important to make sure that the OCR settings are set to “Searchable Image” or “Editable Text” if you’re looking for the highest accuracy. And of course, do not forget to double-check for recognition errors. OCR is not perfect. Nothing is.
Step 2 – Redact the Text Layer
When the doc is finally searchable, it’s time for a dedicated redaction tool (not a highlighter or a shape tool) to join the game. The process is simple but requires a bit of effort and attention:
- Mark for redaction. Choose the text or area. Most professional PDF editors will help you by outlining the area in red.
- Do the redactions. This is the most important part of the procedure! When you click “Apply,” the software doesn't just cover the pixels. It actually removes the underlying image data and text layer from the file once and for good.
- Do not forget to sanitize. Loads of redaction tools tend to ask users like you if they want to remove “Hidden Information” or “Metadata.” Ensure to say yes. Always. This 100% cleans the file history and all the hidden tags.
If you’re new to the process, it helps to first understand how to redact a PDF properly before working with scanned documents.
Step 3 – Verify It Actually Worked
Here’s a simple rule we stick to: never trust a redaction until you have actually tested it. In this case, we recommend using the check of 3 simple points. The first one (the selection test) is about trying to click and drag your cursor over the redacted area. Can you highlight or “catch” any text? If yes, well, the redaction wasn’t successful at all. Then comes the second point, known as the search test. This is where you have to use Ctrl+F (or Cmd+F) to search for the specific word you just redacted. If the search tool finds a result, your sensitive data is still in the text layer. Ouch! Finally, the third point is known as the copy-paste test. You have to copy the entire page and paste it into a plain text editor. If the redacted words appear in the text dump, the document is not safe.
Taking a moment to run these checks helps you avoid serious risks and understand what happens if redaction fails before sensitive data is exposed.
Common Mistakes Specific to Scanned PDFs
Even when you know that scanned PDFs require special handling, certain behavioral mistakes still lead to failed redactions. Here are the most common ones:
- Skipping OCR before redacting. The most frequent mistake is jumping straight into redaction without running OCR first. Without a text layer, your redaction tool cannot detect or manipulate text that hasn't been converted into a searchable format – sensitive information stays visible in the image layer.
- Trusting visual appearance as confirmation. A lot of basic redaction methods simply overlay a black box over the text that you see. Well, it looks secure visually. However, the underlying image or text can still be copied, extracted, or recovered using simple techniques. Always run verification tests after applying redaction.
- Forgetting to sanitize metadata. Some scanned PDF docs include multiple layers, like comments or annotations, that standard redaction instruments tend to ignore. Sensitive data can stay in these hidden layers, even if you believe the main content was redacted. When your tool asks whether to remove hidden information, always say yes.
- Not verifying the result. Applying redaction and closing the file is not the end of the process. Even if OCR is applied, errors are common – especially with handwritten notes, unusual fonts, or low-quality scans – meaning redaction may miss certain words or characters entirely. Running the selection, search, and copy-paste tests takes less than two minutes and is the only reliable way to confirm sensitive data is truly gone.
- Using the wrong tool for complex layouts. Docs that contain tables, multi-column layouts, or mixed content can make standard redaction instruments misalign or skip certain areas. Always use a dedicated PDF redaction tool – not a highlighter or shape overlay – that permanently deletes the underlying data when applied.
Conclusion
Redacting a scanned PDF doc is harder than you may think at first. When it comes to standard redaction instruments alone, they won’t cope with it. But the good news is that by running OCR, properly redacting the text layer, and verifying all the results, you can be 100% sure that sensitive details are truly removed. Like, really removed. What we recommend is this: always remember that a secure redaction process is about completely removing data, not just hiding it so you do not see it. With the right approach, scanned PDF docs don’t scare you anymore and can be just as safe as text-based docs. If you're not sure which tool handles scanned files best, see our bulk redaction tools comparison.
And what matters most is that you should never rush the process. Taking a few extra minutes to double-check your work can prevent serious leaks of sensitive information that, in turn, become very costly mistakes. Proper redaction should follow recognized standards like the National Institute of Standards and Technology guidelines for secure data destruction to ensure information is permanently removed. If you happen to deal with legal, financial, or personal information, that extra caution is not just an option but a necessity you will thank yourself for later.
FAQ
The difference is in approach and methods. Scanned PDFs need OCR first, because text isn’t selectable, and only after that tools can actually detect and remove sensitive data, not just visually cover it.
Simply covering text with a black box doesn’t remove anything from the document, and the data may still exist underneath or be recoverable, especially if OCR was applied later.
OCR allows users to convert images into searchable text so redaction tools can detect names, numbers, and other sensitive data to permanently remove them.
Manual redaction has limitations. For example, it works only for small files, it’s slow, and error-prone. It’s easy to miss sensitive details in large volume documents.
A proper redaction removes text, images, and metadata completely, so nothing can be copied, searched, or restored later.