
How to White Out Text in a PDF
By PDFized TeamPublished on 8 min read
Imagine you open a PDF and see a sentence, a number, a price, or a name you don't want to show anymore. You want a simple way to cover it – fast. But in PDFs, white-out doesn't always mean what people think it means. The text might still exist underneath, and anyone can copy it.
In this guide, we'll explain how to white out on a PDF across different devices and tools, and when it's acceptable – and when it's not.
To white out text in a PDF, you can use Adobe Acrobat, Preview on Mac, Microsoft Word, or a free online editor. Keep in mind that most of these methods only hide text visually – they do not permanently remove it from the file. When permanent removal is what you actually need, see our guide on how to redact a PDF.
What Does It Mean to White Out Text in a PDF?
When we say white out a PDF, it means adding a white layer on top of existing content so the information disappears from view – similar to placing a white sticker over text on paper. Black-out works the same way, just with a dark fill instead. In digital documents, this overlay is not the same as deletion. The original content stays inside the file and can often be recovered by copying the text, removing the annotation, or converting the file to another format. That's why white-out serves a different purpose than redaction. Many people use it for quick corrections during collaboration because it's fast and flexible – but it's not a data removal method, and that distinction matters.
5 Free Ways to White Out Text in a PDF (Step-by-Step)
Each method below works on standard PDFs – pick the one that fits your tool and workflow.
Adobe Acrobat
For many, Adobe Acrobat is the go-to tool for working with PDFs. If your goal is to white out some parts of the text, you don't need advanced editing tools. You can use comment and drawing features of Acrobat to reach your goals. Here's how to do it:
- Open your PDF file in Adobe Acrobat
- Go to Tools and select Comment
- Click the Rectangle tool from the drawing tools menu
- Draw a rectangle over the text you want to hide
- Right-click the shape, select Properties, and set the fill color to white with no border
- Save the file
This method is fast and easy. Shapes added this way sit above the content as annotations – the text underneath stays in the file. To make the overlay harder to remove, flatten the PDF after saving: go to Print and select Save as PDF. Flattening merges all layers (annotations, shapes, form fields) into a single flat image. Once flattened, the white rectangle is no longer a removable object sitting on top of the page; it becomes part of the page itself. This tool works the best when you are preparing drafts, testing elements in a document, or working on layout adjustments.
Preview
If you're a user of a Mac, Preview is a great tool that will help you quickly white out information in a PDF. Usually, this instrument is already installed and can instantly open a file. Many users prefer Preview for simple edits. The Markup toolbar in Preview includes different tools that let you draw rectangles, circles, or highlights. You can fill a rectangle with white and remove the border to create a white-out effect in several clicks. Preview is much easier to use, even for people without experience, compared to full editing software, which makes this tool ideal for quick corrections.
- Open your PDF in Preview
- Click Show Markup Toolbar (the pencil icon at the top)
- Select the Rectangle Shape tool from the toolbar
- Draw a rectangle over the text you want to cover
- Set the fill color to white and the border color to none using the color options
- Go to File > Export as PDF to save
Exporting rather than saving makes the overlay more permanent – it flattens the annotation into the page on most Mac versions. Preview is widely used by designers, coordinators, and anyone reviewing documents on the go. But still, you need to remember that the white layer hides content only visually. It doesn't necessarily remove the underlying data from the file structure.
Microsoft Word
One surprisingly effective method involves opening the PDF in Microsoft Word. When Word imports a PDF, it converts the file into an editable document format. That means instead of covering text, you can delete it.
- Open Microsoft Word and go to File > Open
- Select your PDF file – Word will automatically convert it to an editable format
- Find the text you want to remove and delete it directly
- Review the document layout as complex formatting may shift during conversion – if it does, try adjusting margins or font sizes before exporting
- Go to File > Save As and select PDF as the export format
If the document contains mainly text elements, Word can be very useful. Many people prefer Microsoft Word when they want to use something fast and simple without installing specialized PDF tools. Best for: simple text-heavy PDFs where you want to permanently delete content, not just cover it. Google Docs works similarly: upload the PDF to Google Drive, open it with Google Docs, delete the text you don't need, and download as PDF. The same formatting caveat applies (complex layouts may shift) but for simple text documents it's a fully free option with no software install.
Free online PDF editors
Online PDF editors are very popular because they're accessible from anywhere and don't require downloads or setups. You can easily make changes and download the file again. Most of these platforms include drawing or annotation features that allow you to place white rectangles over text. If you go this route, check the tool's privacy policy first – how long uploaded files are stored matters more than which editor you pick. Popular options include Smallpdf, iLovePDF, and PDFescape, all of which run in the browser with no install required.
- Open the editor in your browser and upload your PDF
- Select the annotation or shape tool from the toolbar
- Draw a white rectangle over the text and set the border to none
- Download the edited PDF
Such tools are beginner-friendly and very appealing for simple tasks. But you need to consider that uploading documents to online services may be risky – especially if the file contains sensitive information. Best for: non-confidential materials where speed matters and you don't want to install anything.
Mobile apps for iOS and Android
Editing PDFs on a phone or tablet is very common nowadays. Many people are reviewing contracts between meetings or adjusting a schedule on the way to an event. Mobile apps make quick white-out edits possible without opening a laptop. Popular options include Adobe Acrobat Reader and Xodo, available on both the App Store and Google Play, and PDF Expert on the App Store. PDF Expert works best for iOS users needing clean exports, while Xodo is a solid free option for Android.
- Download a PDF editor app from the App Store or Google Play
- Open your PDF file within the app
- Tap the markup or annotation tool – usually represented by a pencil icon
- Select the rectangle shape tool and draw over the text you want to hide
- Set the fill color to white and remove the border
- Save or export the edited file directly from the app
Most mobile PDF apps include a markup mode where you can add shapes, highlights, or stickers. By choosing a white fill, you create the same visual effect as on desktop tools. Best for: quick edits on the go when a laptop isn't available.
Need more than a white box?
PDFized removes the text from the file instead of just covering it – free.
How to White Out and Type Over Text in a PDF
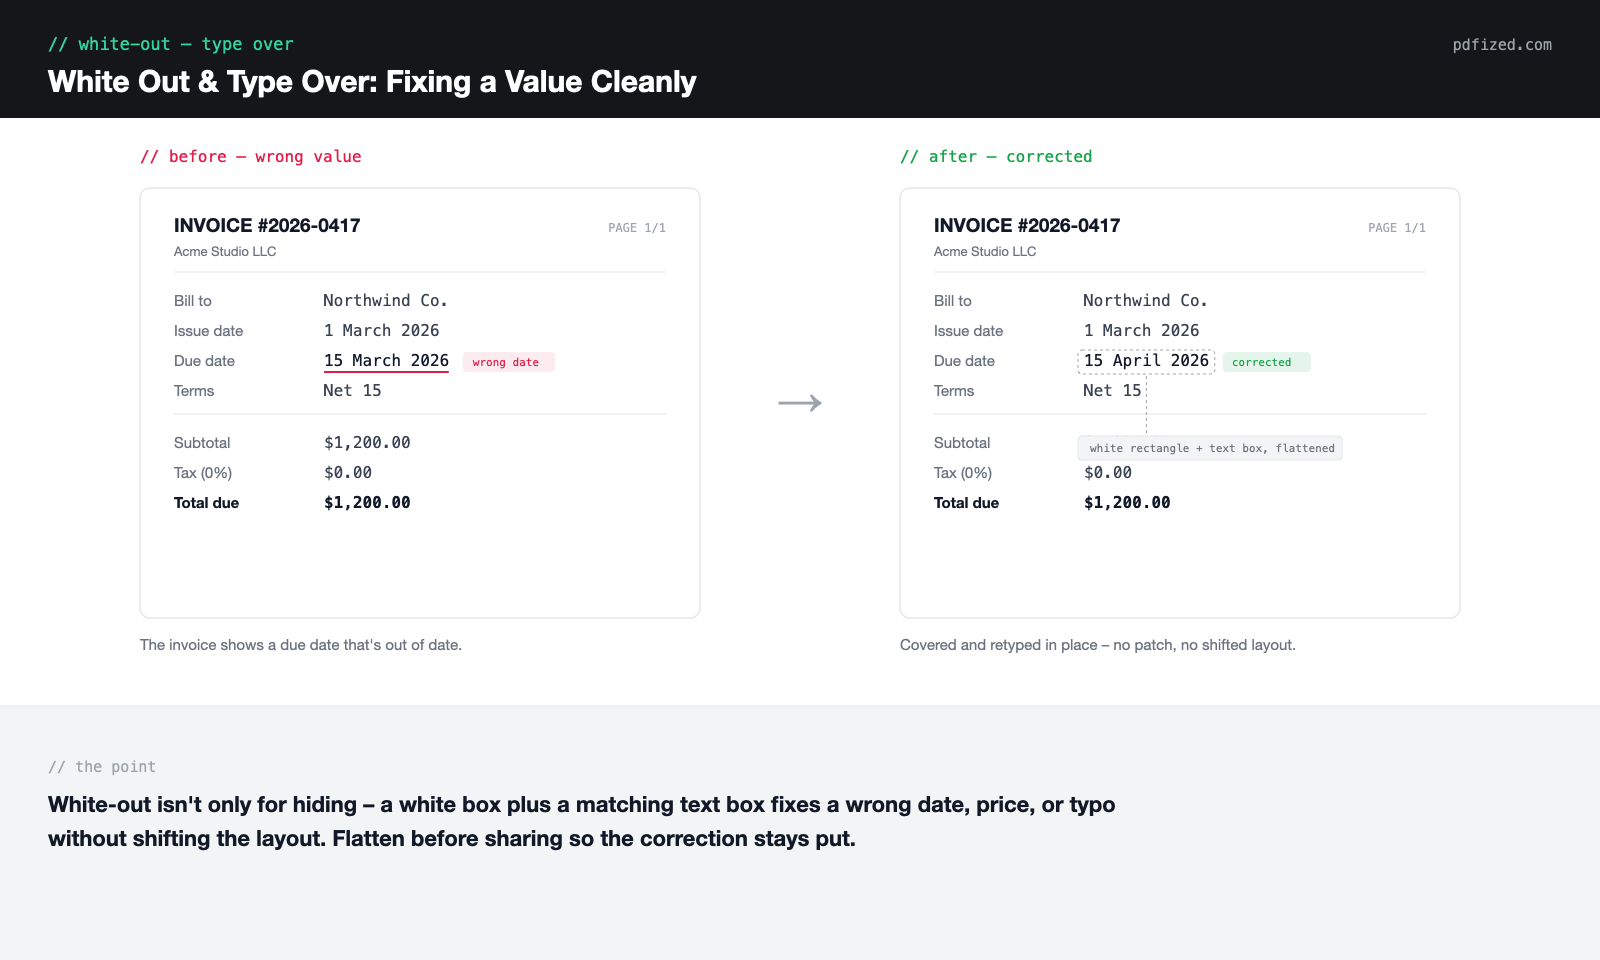
The most common reason to white out a PDF isn't hiding something – it's fixing it: a wrong date, an old price, a typo in a name. Here's how to cover and replace in one pass:
- Draw a white rectangle over the text you want to change, with no border
- Zoom in and match the fill color to the page background – many PDFs aren't pure white
- Insert a text box on top of the rectangle and type the corrected content
- Match the font, size, and alignment to the surrounding text so the fix doesn't stand out
- Flatten the file before sharing so the layers merge into the page
This keeps the layout intact and avoids the formatting shifts that come with editing the PDF directly.
Here's a correction done properly – the old value covered, the new one typed on top, with nothing shifting around it:
Best Tool for Each Use Case
| Use Case | Best Tool | Why |
|---|---|---|
| Quick desktop edits | Adobe Acrobat | Fast, no file conversion needed |
| Editing on a Mac | Preview | Pre-installed, beginner-friendly |
| Permanently deleting text | Microsoft Word | Deletes text directly, not just covers it |
| Editing on the go | Acrobat Reader, PDF Expert, Xodo | Works on phones and tablets |
| Fast edits without software | Smallpdf, iLovePDF, PDFescape | No installation required |
| Sensitive documents | Free PDF redactor | Permanently removes data |
Common Problems When Whiting Out Text in a PDF
Whiting out text in a PDF is usually straightforward, but a few common issues can make the result look unprofessional or fail to hide content properly:
- The white box doesn't match the background. Many PDFs don't use a pure white background. If you place a white rectangle over text, the covered area may stand out because the surrounding page is slightly gray, cream, or textured. Zoom in and compare the background before choosing a fill color.
- Hidden text is still selectable. In many PDF editors, a white rectangle is simply an annotation placed on top of the page – the original text remains underneath and can still be selected, copied, or extracted. If you plan to share the document externally, verify that the covered text cannot be selected – or use permanent redaction if the content is sensitive.
- The white-out layer moves or disappears. A white rectangle that looks correct in one application may shift or become editable when opened elsewhere. Saving a flattened copy of the PDF helps preserve the appearance across different devices.
- Covered text becomes visible after conversion. When a PDF is converted to Word or HTML, the white overlay may not transfer correctly and the original text can reappear. Always review converted versions before sharing.
- The document looks unprofessional. Large white boxes can attract attention instead of hiding information. A quick visual review before sending ensures the final document looks polished and intentional.
White Out vs Black Out vs Redaction: What's the Difference?
| Feature | White out | Black out | True redaction |
|---|---|---|---|
| Hides content visually | ✅ | ✅ | ✅ |
| Permanently removes data | ❌ | ❌ | ✅ |
| Text recoverable underneath | ✅ | ✅ | ❌ |
| Safe for sensitive documents | ❌ | ❌ | ✅ |
| Fast and easy to use | ✅ | ✅ | ✅ |
| Best for drafts & reviews | ✅ | ✅ | ❌ |
As you can see from the table, redaction is the safest way compared to the white out method. It keeps your PDF files completely safe and secure while remaining straightforward enough for beginners to use.
When Is Whiting Out Text in a PDF Good Enough?
There are several security limitations, but white-out is still a useful part of everyday workflow. Many professionals rely on it because it's fast and flexible. White-out makes sense in situations like these:
- You're working on drafts that will change later
- You need to clean the visual look of the document during a design review
- You're preparing internal files that won't be publicly shared
- You want to temporarily hide elements and discuss them with colleagues or clients
- You're testing layouts or experimenting with structure
In these situations, you need clarity and speed, not permanent deletion. A white overlay gets the job done without the extra steps.
Best Practices Before You White Out Text in a PDF
Even when security isn't the main concern, a few small tips will make the process easier for you. If you want to avoid surprises later, start by keeping a clean copy of the original file. You will have the freedom to experiment without worrying about mistakes. If your software allows you to flatten the document before saving, do it – this merges the white overlay into the page and makes it harder to remove. Testing the file after making changes is crucial. Try selecting text in the area you covered and copy-paste it into another app. If the text copies, the overlay isn't permanent and the content is still accessible.
And finally, think about the future use of the document. If there’s a chance that information should be permanently removed, switch to AI redaction to reduce risks and save time later.
Conclusion
Whiting out a PDF is a simple way to save time and make the workflow easier. Most basic methods only hide content – they don't erase it. It's perfect for drafts, internal workflows, and quick fixes, but if there's a chance the document will be shared outside your organization, switch to proper redaction instead.
// faq
FAQ
No. Courts and regulators expect true redaction – if the hidden text can still be pulled out of the file, the document doesn't count as redacted, and that's on you. For anything official, skip the white box and redact properly.
No – a white box only changes what you see on the page. The file's metadata still holds whatever it held before: author names, edit history, hidden layers. Cleaning that up is a separate step – here's our guide on how to remove metadata from a PDF.
It helps – the white box becomes part of the page instead of a sticker someone can peel off. But OCR tools can sometimes still read what's underneath, so treat flattening as extra protection, not real redaction.
Sort of. On a scan, the white box sits on top as a separate layer, so it can be deleted to reveal the page – always flatten before sharing. And if the scan has sensitive data, redact it instead: our guide on how to redact a scanned PDF shows how.